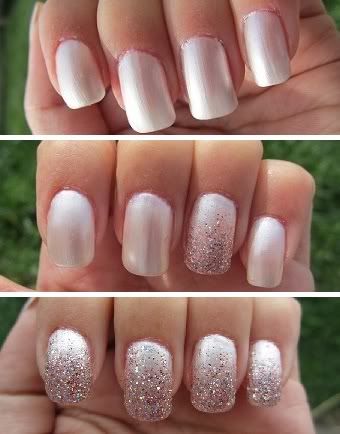
I recently purchased Sally Hansen polishes from their Hard as Nails collection...
1. Dura-pearl #130 (paid: $1.97)
2. Strobe Light #200 (paid: $1.97)
I purchased mine at Walmart!
Overall Review:
This line is very affordable, each polish is only $1.97 so I 100% recommend them if you love polishes but also on a budget. (as am I haha)
The Dura-pearl polish did take 3 coats to achieve the same opaque color as the bottle but even with the three coats it did not feel or look thick (TIP: when doing multiple layers make sure each layer is thin and completely dry before doing the next layer) I also agree with the name of the polish, in person it does look like you have pearl nails.
As for Strobe Light I absolutely love the fine glitter (usually not a fan of huge chunks of glitter polish) it has a mix of silver and pink glitter. The technique I used to achieve the gradient (ombre) like affect, as the pictures show below, were by applying two thin coats from tip to mid-nail and then one final thin coat layer on the whole nail. (Remember: wait awhile between layers to prevent clumps or thickness)
NOTE: I use Seche Clear as a base coat and Seche Vite as a top coat. As I have mentioned in previous posts I highly recommend these too especially the top coat. I use to not use base coats or top coats because I honestly believed you really didn't need them BUT ever since I have purchased them I will never go back. They truly help your polishes last longer without chipping no matter how low-end or high-end the polishes are. They also help give off a nice gloss finish to your nails.
Happy Nails! <3


Love this look!! xox
ReplyDeleteBeautiful nails ♥
ReplyDelete